
Jose Avila
Sofware engineer Published at: undefinedWith tensorFlow we can teach to an AI to recognize elements that you label
Image recognition with TensorflowJS
in this tray to article i’ll wil try to make a “rewind” of the process and the decisions realized in this application it’s can assign an slot to an object trough the webcam and later recognize it again on the slot that you created previously.
The stack
Choosing tensorflowJS to accomplish the functionality was easy, because TensorflowJS have a lot of time around and Google make it their public access AI work tool. Additionally just use plain HTML and CSS for the layout.
But first, what the F*&^k is TensorflowJS?

TensorFlow.js is an open-source JavaScript library that allows developers to build and deploy machine learning models directly in the web browser and on Node.js. It is an adaptation of the popular TensorFlow library, originally developed by Google for machine learning and deep learning tasks. TensorFlow.js brings the power of TensorFlow to the JavaScript ecosystem, enabling web developers to work with machine learning and AI without the need for extensive knowledge of Python or server-side coding.
At its core, TensorFlow.js provides a high-level API for training, running, and serving machine learning models in JavaScript applications. Here’s a breakdown of its key features and components:
-
Model Training: TensorFlow.js supports both training models from scratch and retraining pre-existing models. You can use it to develop custom models for tasks like image recognition, natural language processing, and more.
-
Pre-trained Models: TensorFlow.js includes a selection of pre-trained models that you can use out of the box. These models are well-suited for tasks like image classification and object detection.
-
In-Browser Execution: One of the standout features of TensorFlow.js is its ability to run models directly in web browsers. This means that machine learning applications can work offline, without relying on cloud-based APIs.
-
Node.js Support: TensorFlow.js can also be used on the server side through Node.js, allowing developers to leverage machine learning for server-based applications.
-
Integration with WebGL: TensorFlow.js can harness the power of WebGL for hardware-accelerated computations, which can significantly boost the performance of deep learning models in the browser.
-
Keras API Compatibility: TensorFlow.js offers a Keras-like API, making it easier for developers who are already familiar with deep learning in Python to transition to JavaScript.
-
Data Manipulation: TensorFlow.js provides tools for data manipulation, such as tensors (multi-dimensional arrays), and supports a range of data formats for training and inference.
-
Community and Ecosystem: TensorFlow.js has an active community and a growing ecosystem of tools and resources, including tutorials, documentation, and open-source projects.
With TensorFlow.js, web developers can create interactive, intelligent web applications that can perform tasks like image recognition, speech synthesis, and natural language understanding. It is a powerful tool for building AI-driven web applications, educational demos, and even small-scale machine learning projects, all without requiring users to leave their browsers. As of my last update in September 2021, TensorFlow.js was actively maintained and improved, so it’s likely that new features and improvements have been made since then.
Having said that. Can continue to the fun part, train a model live and run all this trained model in your browser!
Scaffolding
We create a basic nodeJS folder structure, where the all the site data is in the public folder to can publish. But fell free of choose the scaffolding that you consider more conformable to you project.
Note: this project eventually going to moved to an better project with more functionalities.
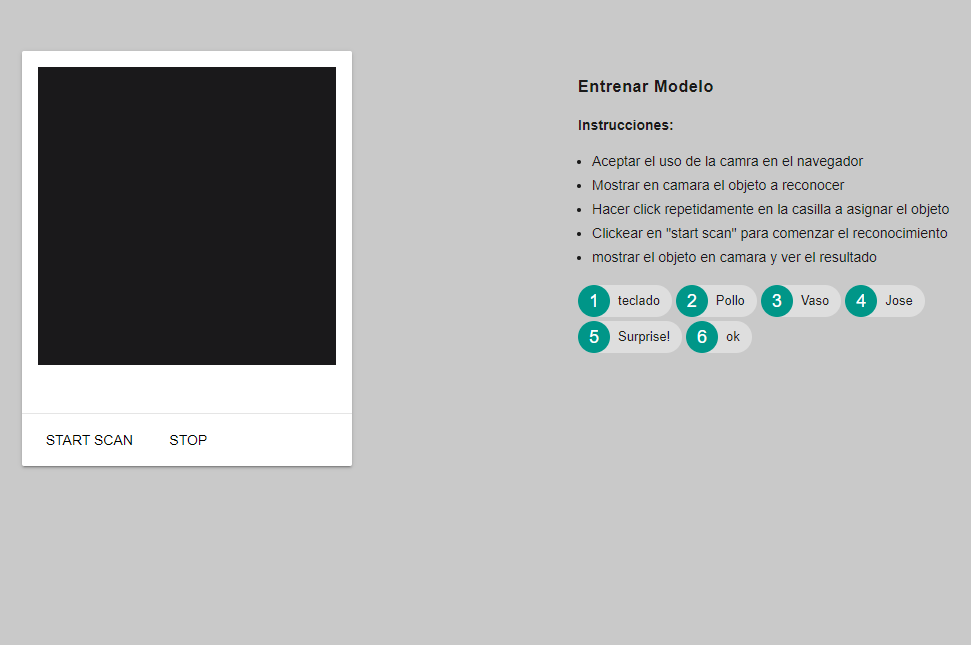
The Layout
At the begging, we gonna create the view for the app. I choose the library of material design to create a quick and ease to do because doesn’t need something fancy.
And the code
<div class="app">
    <div class="demo-card-square mdl-card mdl-shadow--2dp">
      <div class="mdl-card__title mdl-card--expand">
        <video autoplay flip playsinline muted id="webcam" width="100%" height="100%"></video>
      </div>
      <div class="mdl-card__supporting-text">
        <div id="console"></div>
        <div id="console2"></div>
      </div>
      <div class="mdl-card__actions mdl-card--border">
        <button id="stop" class="mdl-button mdl-js-button mdl-js-ripple-effect" onclick="startScan(true)">start
          scan</button>
        <button id="stop" class="mdl-button mdl-js-button mdl-js-ripple-effect" onclick="startScan(false)">stop</button>
      </div>
    </div>

    <div class="settings">
      <h6>Entrenar Modelo</h6>
      <b>Instrucciones:</b>
      <ul>
        <li>Aceptar el uso de la camara en el navegador</li>
        <li>Mostrar en camara el objeto a reconocer</li>
        <li>Hacer click repetidamente en la casilla a asignar el objeto</li>
        <li>Clickear en "start scan" para comenzar el reconocimiento</li>
        <li>mostrar el objeto en camara y ver el resultado</li>
      </ul>
      <div class="chips-holder">
        <button id="clase-a" class="mdl-chip mdl-chip--contact" onclick="addExample(1)">
          <span class="mdl-chip__contact mdl-color--teal mdl-color-text--white">1</span>
          <span class="mdl-chip__text">teclado</span>
        </button>
      </div>
    </div>
  </div>
The fun part: The code
To use tensorflow and his corresponding models to train, just need to import it with (depending on your case) the script with the script tag.
<script src="https://cdn.jsdelivr.net/npm/@tensorflow/tfjs"></script>
<script src="https://cdn.jsdelivr.net/npm/@tensorflow-models/mobilenet"></script>
<script src="https://cdn.jsdelivr.net/npm/@tensorflow-models/knn-classifier"></script>
initialization
The code starts by initializing some variables and getting references to HTML elements. The net variable will hold the MobileNet model, and cam is a flag indicating whether the webcam is active.
let net;
let cam = true;
const imgEl = document.getElementById("img");
const descEl = document.getElementById("descripcion");
const webCamElement = document.getElementById("webcam");
const classifier = knnClassifier.create();
Loading the model
The app function loads the MobileNet model, classifies an image, and initializes the webcam.
const app = async () => {
  net = await mobilenet.load();
  let result = await net.classify(imgEl);
  console.log(result);
  displayImagePrediction();
  webcam = await tf.data.webcam(webCamElement);
}
Scanning and Classifying Images
The startScan function captures images from the webcam, classifies them, and displays the results. It also uses the infer method to get the internal activation of MobileNet, which is used to train the KNN classifier.
const startScan = async (active) => {
  cam = active;
  while (cam) {
    const img = await webcam.capture();
    const result = await net.classify(img);
    const activation = net.infer(img, "conv_preds");
    // ...
  }
}
Adding Examples to the Classifier
The addExample function captures an image from the webcam, infers its activation, and adds it as an example to the KNN classifier.
const displayImagePrediction = async () => {
  try {
    let result = await net.classify(imgEl);
    descEl.innerHTML = JSON.stringify(result);
  } catch (err) {
    console.log(err);
  }
}
Displaying Image Predictions
The displayImagePrediction function classifies an image and displays the result.
const displayImagePrediction = async () => {
  try {
    let result = await net.classify(imgEl);
    descEl.innerHTML = JSON.stringify(result);
  } catch (err) {
    console.log(err);
  }
}
And finally run the app.
App();
Whit this you can train a model to recognize images directly from thw browser. This is very usefull when you try to create autentication with facial rocognition, identify products etc…
you can check out the original repo or the app working
I hope this will be very usefull for you.